 Keys... Keys...
Appendices...
|
 |
|
Configuring the SipTone V Telephone
Once you have verified that your telephone is connected to the network (see the section, Verifying the Installation), you need to configure it. You also may need to modify the configuration from time to time. There are three ways of doing this.
- You may access the website on the telephone's built-in web server using a web browser on a computer that is on the same network as your telephone.
- You may use menus which are accessible on the telephone's LCD.
- You may configure your telephone using an XML auto-configuration file.
This section explains how to configure the telephone using its inbuilt web-site. Configuration->Menu Navigation describes how to navigate the telephone's LCD menu. The third method, configuration by XML file, is described under Appendices->Auto-Configuration.
Accessing the Telephone's Built-in Configuration Webserver
There are several areas to configure on the website, all reachable through links on the
main page at http://<network address>/, where <network address> is the network
address of your telephone, e.g., 10.0.0.167. You can determine what this address is by
pressing MENU/BACK. The address is displayed momentarily on the second line
of the LCD.
From the main page (where your telephone version and serial number are
displayed), you can follow links to pages for
- network setup,
- phone configuration,
- server configuration,
- maintaining memory keys and phonebook,
- setting the administrator and user passwords for accessing your telephone's
website and menu,
- advanced settings, and
- updating the software in your telephone.
 WARNING: Never change
the configuration of your telephone during a call. WARNING: Never change
the configuration of your telephone during a call.
When you first attempt to access the website, you are prompted for a user
name and password. There are two access levels, administrator and user, and
two corresponding user names, "admin" and "user" (without the quotes). The
initial password for both is set at the factory to "1234" (also without the
quotes). You should change the passwords as soon as possible. When you log in
as user, you have access to the general-information, phone-configuration,
memory-key-and-phonebook, and password pages. When you log in as administrator,
you have access to those pages and to the network-setup, servers, advanced, and
upgrade pages. The following table identifes the attributes of each access level.
| Access Level | User Name | Default Password | General | Network Setup | Phone Configuration | Servers | MEM Keys & Phonebook | Change Password | Advanced | Upgrade
|
|---|
| Administrator | admin | 1234 | Yes | Yes | Yes | Yes | Yes | Yes | Yes | Yes
| | User | user | 1234 | Yes | No | Yes | No | Yes | Yes | No | No
|
Network Setup
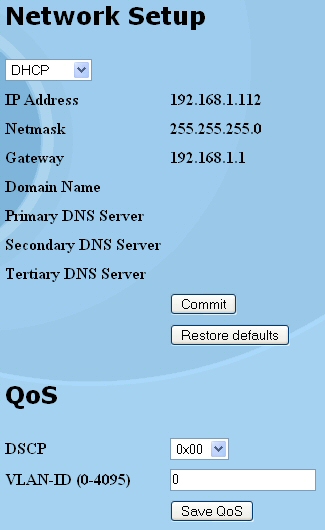
This page contains network and Quality-of-Service, or QoS, settings.
The main network setting on this page is whether DHCP is selected or not. The
choices are DHCP (factory default) and MANUAL. Your service provider or
network administrator can tell you which one to use. If DHCP is selected, no
further network configuration is required. Your telephone retrieves
the network configuration from a DHCP server and your page looks something
like this:
If DHCP is not selected, your page looks something like this:
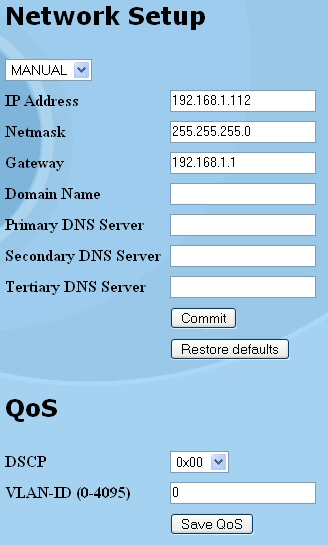
These network-settings fields have the same meaning as the network
settings for other network devices and operating systems. The values for these
fields are supplied by your service provider or network administrator.
Any changes made to the network settings need to be committed by clicking the Commit button. Your changes will take effect only when you commit and then confirm them. The telephone will revert back to factory settings on clicking the Restore defaults button.
The QoS settings are independent of the network settings.
- The Differentiated Sevices Code Point, or DSCP, tells the network
how to handle the data packets transmitted by your phone—what the
performance requirements are with regard to, for example, delay, loss, and jitter.
The normal setting for VoIP is 0x2e.
- The VLAN ID identifies the VLAN on which your telephone resides.
If you are unfamiliar with VLANs, just set this to 0. Note that when your
telephone is on a VLAN—the VLAN ID is set to something other than
0—all devices connected through your telephone's PC network port must also
be on a VLAN, which could be the same as or different from your telephone's VLAN.
Make any changes you need to the QoS settings and then click the button to
save your changes. Your changes only take effect when you save them.
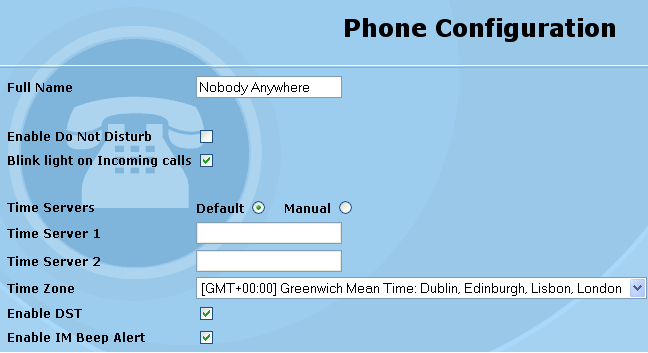
PHONE CONFIGURATION
The phone-configuration page contains basic settings and features that a user initially sets up and might want to change from time to time, such as his or her name and whether to block Caller ID. A part of your page looks something like this:
The next part of the Phone Configuraton page allows you to configure attributes which are specific to the line selected. Each line has to be configured separately. You may specify attributes such as call forwarding URI, user ID, password and dial plan etc. The changes will take effect only when you press the commit button.
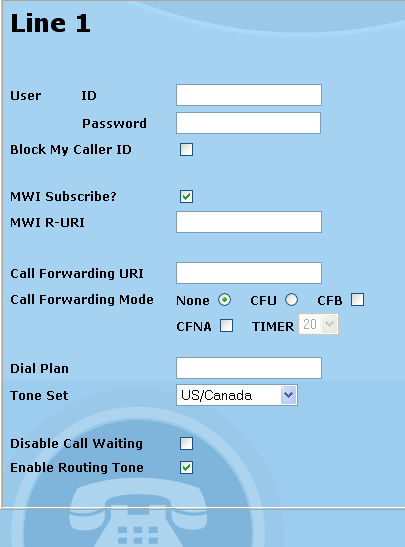
- The user identifier and optional server password are used for server access. The user identifier might be a nickname such as 'jsmith' or a service-provider-assigned telephone number such as '5550123'. Spaces are not allowed in the user identifier. Your network administrator or service provider will tell you what to use for these fields.
- The block-my-caller-id field prevents your Caller ID from being shown to the other party. This only occurs, however, when your telephone is configured to use a proxy server, because the server strips out the Caller ID. Without a server, your Caller ID cannot be blocked, and so the other party can always see it.
- Phone receives notifications from server whenever it has a voicemail message. Phone indicates this by a blinking message waiting light that is present at the top of the telephone. To receive such notifications telephone needs to subscribe for it first by filling in the server address as specified by service provider. This server address is filled in the MWI R-URI field.
- Filling in the MWI R-URI alone does not qualify your telephone for receiving notifications for incoming voicemail messages. The MWI SUBSCRIBE? checkbox also needs to be checked.
- The forwarding-address field contains the network address or SIP URI of the telephone to which you want to forward incoming calls. Leave it blank or specify no call forwarding if you do not want to forward calls. Select whether you wish to forward all calls, forward calls when your telephone is busy, or forward calls if you do not answer after the selected number of seconds.
- So that you do not have to indicate to your telephone when you have finished entering a telephone number by pressing the DIAL softkey or DIAL/REDIAL (although you may continue to do so), you may provide a dial plan of up to 128 characters (see the Dial Plan appendix) which tells your telephone what a telephone number looks like. Once your telephone recognizes a complete telephone number, it automatically places the call.
- You may select which set of tones your telephone uses based on your regional preference.
- Call Waiting can be disabled so that your telephone immediately rejects an incoming call if there is already an active call.
SERVER CONFIGURATION PAGE
The server page requires some familiarity with SIP. Use it to specify a SIP
registrar, proxy, conference server, voicemail server, and related
parameters, but first contact your network administrator or service provider
for the correct settings.
If you instruct your telephone not to perform registrations at all, your page looks like the picture below. When this is done, the telephone can only make a call to some other telephone on same network only using its fully qualified domain name or using its IP address. Your telephone cannot make calls to phones on some other network.

It is best to use a SIP URI to explicitly designate the registrar. A simple network address, e.g. 10.0.0.200, is also allowed. If you wish to register both the lines manually, then your page looks like the picture shown below. In this case you are able to make calls to other telephones on some other network. You can select lines independently and configure their features. Fill in the values for various servers manually but first contact your service provider for correct addresses. The changes will take effect only when you click on COMMIT CHANGES button at the bottom. The status of submission is displayed at the bottom. Any message other than SUBMISSION SUCCESSFUL means that you made a mistake in filling in some configuration value.
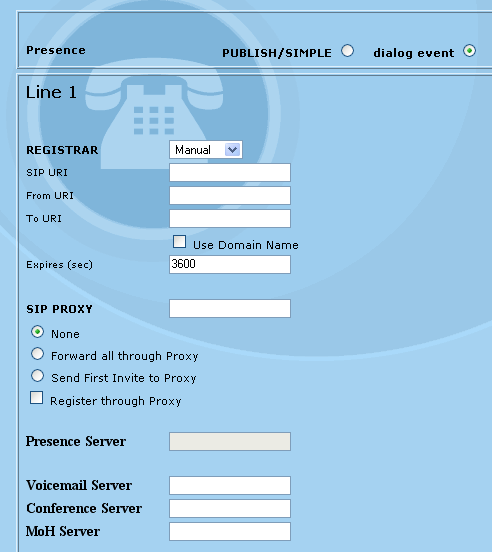
- The to-address field contains the address of record whose registration is to be created or updated, i.e., how you want the outside world to see you from your SIP proxy/registrar, as in sip:user@example.com, where a proxy server for the example.com domain forwards SIP messages to you after receiving the above SIP URI from other parties. Note that, to enable keypad dialing, you must specify a registrar or proxy. If both are specified, the proxy has precedence.
- The from-address field is the same as the to-address field except in the case of third-party registrations on your behalf.
- The expire-time field specifies the registration duration as reported to the registrar in units of seconds. The default is 3600 seconds, or one hour.
- If you are using a registrar and select the use-domain-name feature, your telephone automatically creates the addresses of record in the to-address and from-address fields. It combines the user identifier that you specified on the phone-configuration page with the local domain name obtained from DHCP or manual configuration (refer to the network-setup page for your domain name). Note that you can change the addresses of record at any time, even if they were generated automatically.
- Specifying a value for the proxy field causes your telephone to send various SIP messages through the outbound proxy indicated by the specified address or SIP URI; otherwise, it sends all SIP messages except SIP registrations directly to the remote end.
- If a proxy is specified and the forward-all-through-proxy feature is selected, all SIP non-registration messages are sent through the proxy.
- If a proxy is specified and the send-1st-invite-to-proxy feature is selected, only the first invitation is sent through the proxy, which is useful when the telephone is used with a redirect server.
- If neither of these features is selected, only dialed numbers and unresolved URIs go through the proxy.
- If a proxy is specified and the register-through-proxy feature is selected, SIP registration messages are sent through the proxy.
A SIP proxy is useful for traversing firewalls, assuming your proxy can rewrite addresses, and handling irresolvable SIP URIs, such as telephone numbers. When both a SIP registrar and proxy are specified, you can have your phone register directly with the registrar rather than through the proxy.
- To use a voicemail server, specify its address in the voicemail-server field.
- To use an external conference server rather than the built-in conferencing capabilities of your telephone, specify the server's address in the conference-server field.
- To use the presence feature specify the presence server as provided by your service provider. For this you need to use PUBLISH/SIMPLE and specify it at the top of the page.
- To use MUSIC ON HOLD service, specify the MoH server's address in the MoH Server field.
Your changes only take effect when you commit them by pressing COMMIT CHANGES button.
MEMORY KEYS AND PHONEBOOK MAINTENANCE
This page is used to set and maintain the speed-dial memory keys and the phonebook.
The page looks something like this:
 For each memory key, fill in the nickname (no spaces) and SIP URI, such as
JohnSmith john@192.168.1.1
and then click the Save MEM value button. The "sip:" is optional and your telephone automatically prepends it if missing. The phonebook is a little different than the rest of the website. Elsewhere, you maintain a few fields; with the phonebook, you maintain a list of SIP URIs along with nicknames for the people associated with them.
Check presence is optional. If you want to monitor the status of the user whose URI you are saving in the MEMKEY, then check the corresponding Check Presence box (but only when you have selected PUBLISH/SIMPLE), otherwise leave the presence check box unchecked.
Line number 1 or 2 is selected to specify for which line is the entry saved. Suppose Line1 is selected for MEMKEY1. Now whenever this speed dial MEMKEY1 is pressed then dialing will take place through Line1. Also if Check Presence is checked then status of that telephone is reported through the selected line.
- To add an entry to the phonebook, fill in a nickname (no spaces) and SIP URI, such as
JohnSmith sip:+14085550100@192.168.1.1
and then click the Add to Phone List button, which commits your addition. The "sip:" is optional - your telephone automatically prepends it if missing.
- To delete entries, select one or more, and then click the Delete button, which commits your deletion.
- To change entries, you must delete and then add them again.
- Alternatively, from this page you can load a phonebook from your PC as a text file that you created through some other means. Importing a phonebook commits the additions to your telephone. Note that importing is additive. It does not replace your existing phonebook even if entries have the same name. A line that starts with the # character in the phonebook file is ignored as a comment line. The space and tab characters can appear anywhere except within a nickname or URI.
- You can also save the phonebook to your PC as a text file. This text file contains any number of phonebook entries, each on a separate line made up of a nickname and SIP URI.
Whenever entries are added to the phonebook, either through the website or by importing a phonebook from your PC, there is the possibility that one or more entries will have the same nickname. Your telephone resolves this conflict by appending a number to nicknames as needed to make them unique. For example, if the phonebook on your telephone already contained an entry with the nickname, JohnSmith, and the user imported a phonebook from a PC that contained an entry with the same name, the second entry would be named JohnSmith_2 in the telephone phonebook.
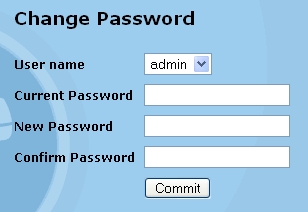
PASSWORD CONFIGURATION
This is the page where you specify the admin and user passwords that grant access to your telephone's website and LCD menus. To change a password, select the one you want to change, specify the current password and the new password you would like to use. Enter the new password a second time to help prevent establishing a password with an unknown typographical error. Once you enter the current password and the new password twice, click the Commit button to commit your changes. Your changes only take effect when you commit them. If you forget your password, there are several ways you can restore the factory default (see the section, Troubleshooting). The password-configuration page looks like this:
ADVANCED SETTINGS
Like the server page, the advanced-settings page requires familiarity with SIP. Here,
you can specify, for example, the default SIP port for your telephone, a syslog server, autodial
parameters, keepalive settings, your preferred codec, and whether to use preloaded
route. However, you should only use these fields if you have extraordinary needs and a full understanding of their meaning.
The upper part of the page looks like the picture below. The changes done here are applicable for both the lines.

- If you have a NAT/firewall that you want to traverse, specify its WAN, or outside, IP address. You also need to configure rules in your NAT/Firewall to forward incoming SIP, RTP, and RTCP UDP packets to the ports on your telephone, e.g., 5060, 5012, and 5013. Multiple telephones behind the same NAT may be configured with different sets of ports. (If you use a proxy server, it must support ports in addition to the default ports.) For example, if you have two telephones, you could configure one to use SIP port 5060 and RTP port 5012 and the other to use SIP port 5070 and RTP port 5022. You would then need to configure your NAT/firewall to forward all incoming UDP packets for ports 5060, 5012, and 5013 to be forwarded to the IP address of your first telephone and forward all incoming UDP packets for 5070, 5022 and 5023 to be forwarded to the IP address of your second telephone.
- You can specify a syslog server for the logging of SIP messages received from and sent to your telephone. Setting up a syslog server is beyond the scope of this document. Leave the syslog-server field blank if you do not understand what a syslog server is, effectively disabling the syslog feature.
- When the session-timer feature is enabled, your telephone uses a 'keepalive' mechanism in order to better detect whether a call has been disconnected. Enable session timer flag enables the session timer.
- Rather than configure your telephone from the website or menu, you can alternatively download configuration files from a TFTP, HTTP or HTTPS server (see the Autoconfiguration appendix for details). The configuration-server-type field specifies which protocol to use to download the files. If you select HTTP and access the HTTP server through a proxy, you can specify the proxy address and port number. The configuration-server-address field contains the address of the server from which your telephone downloads configurations and a dial plan via its optional auto-configuration feature. Note that this is not where the address is specified of the file server from which your telephone downloads software upgrades (see the appendix, Updating the Software). The only profile type currently supported is that described in the Auto-configuration appendix (Profile-C), so set the auto-config-profile field to NONE to further disable auto-configuration and to Profile-C to enable it. The auto-config-path field specifies the path, relative to the server's starting directory, from which your telephone downloads the configuration file (this is also used for downloading a dial plan). You can also force your telephone to load the configuration file every time it boots by checking the auto-config-every-boot field; otherwise, it loads the file just when you click the commit button on this page.
- If Hot-Desking auto login after configuration is checked then telephone logs in automatically using the user IDs that are configured on Line1 or Line2. If none of the Lines is configured then telephone asks for the login user name, password and Registrar at the startup.
- Default Line for outgoing calls has three options: Line1, Line2 and Last Used Line.
- If Line1 or Line2 is selected then the selected Line is used as default line for making calls.
- If Last Used Line is selected then the line which was last active is used.
The active line is indicated by an Asterisk (*) in front of the Line number on the telephone screen.
- Using the secure data scheme the voice is transferred in a secure way. There are 2 options for this, Best Effort and SRTP only. These are 2 ways in which security can be maintained. However you should select any of these only when you have required knowledge about them.
- Intercom Timeout(Secs) is the time in seconds after which an intercom call should be disconnected. This timeout works for both the lines.
The later part of the advanced settings page looks like the picture shown below. These settings are Line specific and also can be configured for each line independent of the other.
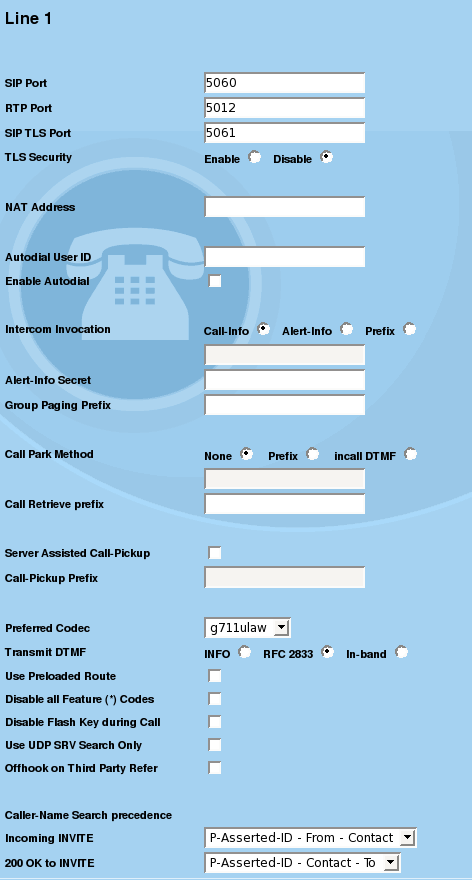
The fields present in the page above are explained in detail below.
- The default SIP and RTP ports, which are normally 5060 and 5012, respectively, are the ports at which you wish other parties to contact you. Note that the RTCP port is not specified because it always is the RTP port + 1.
- TLS security means transferring data in a secured form. Whenever TLS security is enabled and SIP TLS PORT is configured then data transmission takes place in a secured and encrypted form.
- The autodial fields are for connecting to the remote proxy without dialtone or ringing. The autodial user ID gets dialed without any need to enter a number as soon as the Receiver is picked up or SPEAKER or HEADSET button is pressed.
- Intercom call can be made using one of the three techniques Call-Info, Alert-Info or Prefix.
- When some digits have to be prefixed every time you make an intercom call then it is better to select the intercom prefix. Whatever is there in this field gets attached to the number you enter while making an intercom call.If 'Prefix' is not selected then 'prefix' text box is also greyed out and whatever is there in this box has no significance while making calls.
- If Alert-Info is used then Alert-Info secret should also be given some value. This value is matched with the callee telephone's Alert-Info secret. If these secrets match only then is the intercom call possible. Otherwise the call becomes a simple call.
- Group Paging Prefix is the prefix that is attached while you make a group page.
- Choose None, Prefix or Incall DTMF as the call park method. If None is configured then you will have to enter the whole number of the park extension. If Incall DTMF is used then the call is parked automatically using the number present in the Prefix textbox. Incall DTMF can only be used if your server supports it.
If you are using Prefix method then while retrieving a parked call the URI that is dialed is same as the URI used to park the call along with some prefix. The prefix could be entered in call retrieve prefix field so that it is always automatically attached to the URI that is dialed while retrieving a call.
- If Server-assisted call pick up is checked then call can be picked using the options provided by the server itself. Otherwise simple call pickup is done. The call pickup prefix can also be specified. This prefix is then used for call pickup.
- If you have a preference, you can influence which audio codec your telephone uses by specifying a preferred codec.
- The preloaded-route feature adds a SIP Route: header in outgoing messages to request that the outbound proxy be included in all return paths. This is ideal for firewall traversal for those SIP proxies that support this feature.
- Disabling feature codes causes your telephone to not process and to instead pass through all key presses for star feature codes, e.g., *67, *69, *70, and *99, for downstream processing.
- Select the method that you would like your telephone to use to transmit DTMF keypad presses during a call. The choices are
- the INFO method as defined in IETF RFC 2976,
- injected into the RTP stream as defined in IETF RFC 2833 (if the remote end does not support, in-band is used), and
- in-band as audio.
- You can specify to only use UDP SRV search in order to limit the extent of DNS name resolution searches.
- Disabling FLASH during calls allows for other methods of getting a second dial tone. Selecting RFC 2833 as the transmit-DTMF method causes the telephone to simply transmit the RFC 2833 flash event instead of processing this key press internally.
- If you would like your telephone to automatically go offhook when it receives a third-party REFER message, enable it here. This is for situations where the user initiates a call from a third-party device, such as a PC-based softphone or click-to-talk feature, but then wants your telephone to go offhook and actually place the call.
- Caller Name search precedence is the precedence in which the telephone searches for the display Caller Name in the incoming INVITE or 200 OK to INVITE.
- If P-Asserted ID-From-Contact is used then first P-Asserted ID header is searched and then From and then Contact headers are searched.
- In the same way 200 OK to Invite is searched according to the sequence selected.
UPGRADE
See the section, Updating the Software.
Copyright © ipDialog, Inc. 2008 All rights reserved.
|