 Quick Reference Guide
Overview...
Installation...
Configuration...
Layout
Call Features...
Display Examples
Keys...
Maintenance
Appendices...
Glossary Quick Reference Guide
Overview...
Installation...
Configuration...
Layout
Call Features...
Display Examples
Keys...
Maintenance
Appendices...
Glossary
|
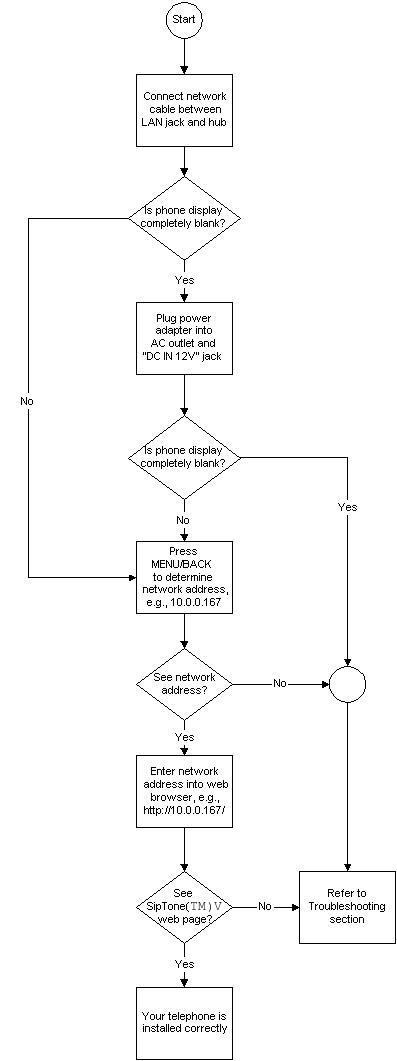
Installing Your Telephone on a Network
First, connect one end of a network cable to the LAN/PoE port on the back of your telephone and the other end to a port on a network device, such as on a hub or cable/DSL modem. If the LCD on your telephone is still blank, plug the power adapter into an AC outlet and connect it to the power jack marked "12V DC" on the back of your telephone.
Choose an area near an electrical outlet and a network port. 1. Take out the foot stand and insert it into the slot provided at the back of your telephone. Now the telephone can sit properly on a horizontal surface. 2. Connect one end of the spiral cable to the handset and the other end at the back of the telephone. Rest the handset on the cradle. If you want to mount the telephone on a wall then there is no need to insert the foot stand. There are slots in the back of the telephone where a hanger can slide in. There is a hook in the handset cradle that slides into the handset and holds the handset when the telephone is mounted in a vertical position. You may also remove the clear plastic protective sheet from the LCD.
Once your telephone is physically connected to the network and power is applied, you
can verify that your telephone is logically connected to the network by accessing its builtin
website with a web browser. First, find out what your
telephone's network address is by pressing MENU/BACK. The address is on the
second line of the LCD. Now enter the following URI into your web browser,
replacing Assuming you have the common command-line ping utility installed on a host on your
network, you could also "ping" your telephone to test connectivity. Get to a commandline
prompt on a PC, e.g., from a terminal session under Linux or from a command
window under Windows (press Start, select Run, enter "command") and enter the
command,
Alternative Methods of Assigning the Network Address When it is first powered up, your telephone may attempt to contact a DHCP server on the network to automatically obtain a network address. It needs this address in order to communicate with other telephones and so that you can access its website via your web browser. If it were not able to obtain an address, you must enter this and other network information into your telephone directly using its LCD menu (see the section, Menu).
Connect one end of a network cable to a network port, such as on a hub, wall plate, or cable/DSL modem, and the other end to the port labeled LAN/PoE in the back of the telephone. This is an Ethernet port. If the LCD displays "No Network Cable" at startup or during any other time, it indicates that the telephone is not properly connected to the network.
Your telephone contains a full-duplex auto-sensing Ethernet switch so that you may plug another network device, which is typically a PC, into it. This provides network access to both your telephone and PC through a single external network connection. Connect one end of a network cable to the network port on your PC and the other end to the port labeled PC in the back of your telephone.
Plug the power adapter into an electrical outlet and the DC connecter into the AC-Adapter Port on the back of your telephone.
When you first power up your telephone, its access mode is "user". You should change the administrator password at this time. You do this by first changing the access mode to admin by pressing MENU/BACK and then pressing the SETUP, RSET, MODE, and YES softkeys. Your telephone prompts you for your admin password. The default password is "1234" (without the quotes). Once you supply the correct password and press the ENTER softkey, your access level will be admin. Press MENU/BACK, SETUP, RSET, and PASWD softkeys. Enter the old password, "1234" (without the quotes), and press the ENTER softkey. Now enter a password of your choosing, using the 123/abc/ABC softkey to change the data-entry mode and the DEL softkey as a backspace key. When you finish entering your new password, press the ENTER softkey, which takes you to another display where you enter your new password again in the same way for confirmation. Important: Be sure to remember your new user password. If you forget your password, you will have to reset your telephone to the factory defaults (including the default password of "1234") using one of the procedures in the Troubleshooting section.
Copyright © ipDialog, Inc. 2008 All rights reserved. |
 CAUTION: If your network connection
provides power to your telephone (through Power-over-Ethernet), do not use the
power adapter.
CAUTION: If your network connection
provides power to your telephone (through Power-over-Ethernet), do not use the
power adapter.